Since my discovery last weekend that I had effectively blocked the CPR staging to the point that it wouldn’t function effectively with the existing closet shelf brackets, I’ve fixed that problem, and moved on with some actual layout building, working on the traversers, laying out elements, and my first mockup building.
Replacement shelf brackets in place, which give me the space to have a full set of tail tracks at both ends of the closet traverser. I have a piece of wood perfectly sized for the one end, I’ll need to get a piece cut for the other if I do want to add more tracks.
One big plus of the problem I discovered last week is that it means I get more staging and run around space in the closet. I don’t know if I will need it or not, but it won’t hurt to have it. Two metal L brackets later, the storage shelf in the closet is supported, and the tracks are no longer fouled. I’ll need to carefully remove the foam from the one end in the closet to remove the wood and install the new piece, but I have an off-cut from the benchwork construction in August which is the perfect size for the staging in this area.
As I’d noted last weekend, I was using the new rotary cutter I bought to cut cork and foam. The traversers both now have their cork roadbed in place. It’s not glued down yet, no reason other than I hadn’t gotten around to it!
Two shots of the CNR Staging Traverser, now with cork roadbed in place. On the right you can see me mocking up the roads with EVA Foam, which will be the underlay to raise them almost to track height so I don’t have to use as much putty/plaster to create the roads.
I’m doing everything in nice slow stages. Build the benchwork, let it sit and settle a bit, put on the foam, let it sit and settle a bit. Lay the cork, let it sit and be sure before I glue it down. In a few weeks time once my friend is done building switches, then I’ll be motivated to start getting cork glued down so I can actually lay some track. Early 2019 is going to be fun with laying track and then figuring out wiring and DCC to run some trains! I want to have the track laid and wired and running flawlessly before I start any serious scenery work.
I debated back and forth about laying track directly onto the foam instead of using cork, but I decided I wanted to use the cork, as it will raise the track level, which means I can build “foundations” for the buildings that can be blended into the scenery. Liberty village was pretty flat, even between the tracks and the road, but between the cork/track and the EVA sheet raising the roads to basically rail level, it will give me the opportunity to fill the gaps with sculptamold/ground cover materials to create undulations and imperfections so that everything isn’t unrealistically washboard flat.
That said, while I’m not starting full on scenery, I am going to start working on mockups of the buildings for the layout to get a sense of size and scope of the work I have coming in building buildings, and to look for places where the buildings as I’ve envisioned them will block operations.
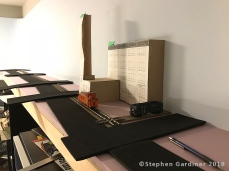
Brunswick Balke Collender takes shape, in cardboard mockup form. Depth makes such a difference, and quick mockups allow for making decisions before time is spent on finished buildings.
The Brunswick Balke Collender Co factory is going to be the first thing people see when they enter the room. I’ve had a printout of a drawing taped to the wall since the summer, but with starting to block out roads and such to see how/if things will work as planned, it seemed like a good time when I got a big piece of thin cardstock to make a mockup. Mockups are great, they are fast, make a layout look less empty, and let you look for things you’ll need to adjust in the finished model. For example, the main building will just be the south wall, set at an angle so that the east side has a bit of depth, and the west side will have non/minimal. The boiler house, a separate building is going to need to be compressed to fit the space. It’s going to have its full width and height, but will be somewhere around 30% of its actual depth. My mockup is a bit too deep still, but its a lot cheaper and easier to find out my first estimate was too big in cardboard than styrene later.
As I move forward, I’m sure I’ll find lots more adjustments to buildings once the track is in place and I prepare the mockups, but that’s all part and parcel of the layout building experience.


Just don’t get carried away, on a rocket man!