Prepping for recent operating sessions has made me realize that I have too much rolling stock for my small layout. This is both a good and a bad thing. Its good as it means I have some variety for operating sessions to not have the same cars running in and out every time so it doesn’t feel familiar to repeat visitors. I discovered this as I was preparing switching lists and trying to think through the work a crew would need to do, and I realized there was not enough room for crews to run around and manoeuvre because of rolling stock parked in staging. I recalled that my friend Trevor Marshal had storage drawers beneath his former Port Rowan layouts staging for equipment storage, and I asked what he had done to keep models from rolling around in drawers. His answer, a cheap rubber rug holder cut to fit his drawers. So I duly ordered one and after it arrived, move the miscellaneous bits and pieces out of the drawer below my work keyboard and cut the mat to fit.
A PVC rug mat, cut down and put in the desk drawer to keep models from rolling.
Once it was in, it worked exactly as planned, the problem I had, was with the keyboard bench attached, it was almost impossible to see what was in the drawer. Putting my thinking cap on, I quickly realized I could sketch a quick label holder to 3D print, and prep laminated car tags, and have an inventory system in the drawer. It also helped me to inventory the cars and rolling stock on the layout. 51 in service freight cars after a recent acquisition of 8 expertly built models (though only 6 of them are making the layout, two are too far out of era but I couldn’t pass them up). With the tag holder done so I could see what cars are in the drawer, without doing my initial plan of sticking labels beneath the roof walks, I realized I needed something to hold tags for the cars on the layout. Another quick sketch, and a tag holder that I could stick label maker labels onto to identify which reporting marks are in which pigeon hole, and away we go!
3D printed bits for car storage. ID tag holder and storage for ID tags for cars on the layout.
I don’t think this drawer is perfect long term, but at present, I don’t have a better option and there is no room for more furniture in the layout room. The drawer, when done will give em room for 16 cars in storage for swapping out between operating sessions. At present, there are 11 cars in the drawer. I have 3 kits to build, so there will be some room to spare. For now at least, this was a simple and cheap intervention to make space on the layout. On we go!
If you read the blog, you know a big chunk of late 2023 was spent lighting the layout room, followed by my acquiring a 3D printer for the home, and being suitably distracted by having it in the house to play with. Now that the 3D printed is settled into a space, and definitely staying, I needed to get some more light directly onto it for when I am working on it and in particular, changing spools of filament. Being a handy type, I looked at options from others on Thingiverse designed to fit into the rails of the printer, and decided I didn’t like them. As a result, I drew my own bar. A pair of 3D printed clips/end caps that press fit onto the IKEA Ivar frame, and hold a piece of leftover 1×2 from a project, with a spare LED light bar from my fall cabinet lighting spree. The first design was too tight on the wood to get it in, and too tight on the Ivar to install. After a couple of quick adjustments to the part in my 3D design software, the second print worked, so after mirroring the design, a flip side was printed, the piece of 1×2 cut to size, and an angled light bar that directs light down onto the printer area is now installed. I like the fact that it is a non-permanent solution, if I find its in the way for any reason, it just pops off. It is really nice to be able to fix my own problems by making parts at home. I am really glad I bought this second hand printer from a friend.
I don’t normally write about things that are kind of in my backburner pile. I have lots of things going on that are really just mental distractions. I also, don’t normally write about new product announcements, but here we are too. My friend Trevor has already written about this announcement here, and he’s summed up where I am too. I don’t need these, but boy do I want them!! What is the announcement? Well, Rapido Trains is doing the first Toronto Subway Cars, the G series from Gloucester Railway Carriage and Wagon Company in England. Back in 2015-16, I was working on a project with a friend to 3D print a G series body shell that would fit onto the Life-Like (later Walthers) New York Subway Car Chassis. They are approximately the same length and wheelbase, or at least close enough to beat making custom frames and mechanisims. We got as far as a first test print, having searched for drawings, and measured the preserved cars at the Halton County Radial Railway. The one test print below looked ok, showed some issues, including that I put the body bolster mounts at the wrong height, so it rode way up on the frame, but as a proof of concept, it worked. It then got shelved, for many reasons and many projects that took priority.
Circa 2016 3D printed shell for a TTC G1 Subway Car, designed to fit a Life-Like NY Subway Chassis. Don’t need that anymore!
I had a sense this was coming, as Jason Shron had waxed poetically about wanting to do them in the Rapido Newsletter in April 2023, so the fact they were the Christmas Announcement didn’t completely surprise me. Now I am deep into debating what I order (a 4 car set, a 2 car set), the only thing I’m reasonably certain of is that I am not ordering the 2 car pre-made diorama. That said, I am now thinking hard about how I would display subway cars, and what I could do to create an appropriate Toronto Transit Diorama for them, but that’s a problem for some other day. For now, back to the workbench and some Christmas Break productivity on models I am actually building!
So, I have been in the 3D printing thing for models since 2012, but, I have never had my own printer. I have, long thought about an Elegoo Mars or similar resin printer, but a few things about our house and my modelling setup conspired against that. In our condo townhouse, we have limited options for where a resin printer that can be smelly, and a bit nasty in dealing with the resin could be set up and ventilated. Honestly, I have come as close as having a printer in my shopping cart online and staring at it for hours debating hitting “buy” or not. So last week, a friend sent a message to a group chat that he was selling his older filament printer as he was upgrading, and doing so to one of us if we wanted it at a friend price. For $80, I couldn’t pass it up, even though I don’t know where its going to go in the home office/workshop.
So, I sent him an e-transfer, and went out and ordered some PLA plastic filament for my new to me Crealty Ender 3 3D Printer. Once he dropped it off, I was going to wait to play, but who are we kidding. As soon as I’d gotten a chance to look at it, and had some spools of plastic, I was printing! I decided to start by going easy, with a simple outline model. Not a lot of height, no crazy shapes, just simple. This was not something I drew, but downloaded from Thingiverse, a website that offers a library of free models offered up by designers. There is a lot of stuff there, some of it great, some of it crap. To each their own in selecting what to print.
Ender-3 3D Printer, for now living on the office floor, and my very first print at home, a simple outline of Mosport Racetrack outside Toronto showing the outline below separated from a raft to help hold the print in place while it prints!
As with everything, there is a learning curve. Some of my early prints have worked exactly as planned, some have not. There are still a lot of things that can go wrong, but my initial early returns are this is a well designed machine, and reasonably straightforward to use for someone like me who likes to think they’re clever…
…(though my specs are not brainy specs…they’re blind guy specs to see) and I may not actually be clever, but like the Doctor I like to think and act like I am!
With some small prints out of the way, It was time to move onto bigger and more hobby useful things. Again from Thingiverse. Over the years, I have spilled a lot of paint, glue and other liquids clumsily in my inevitably messy workspaces (my bench cycles from meticulously clean and organized to a level of chaos when building that eventually triggers me, leading to a cleanup to meticulously clean and repeat).
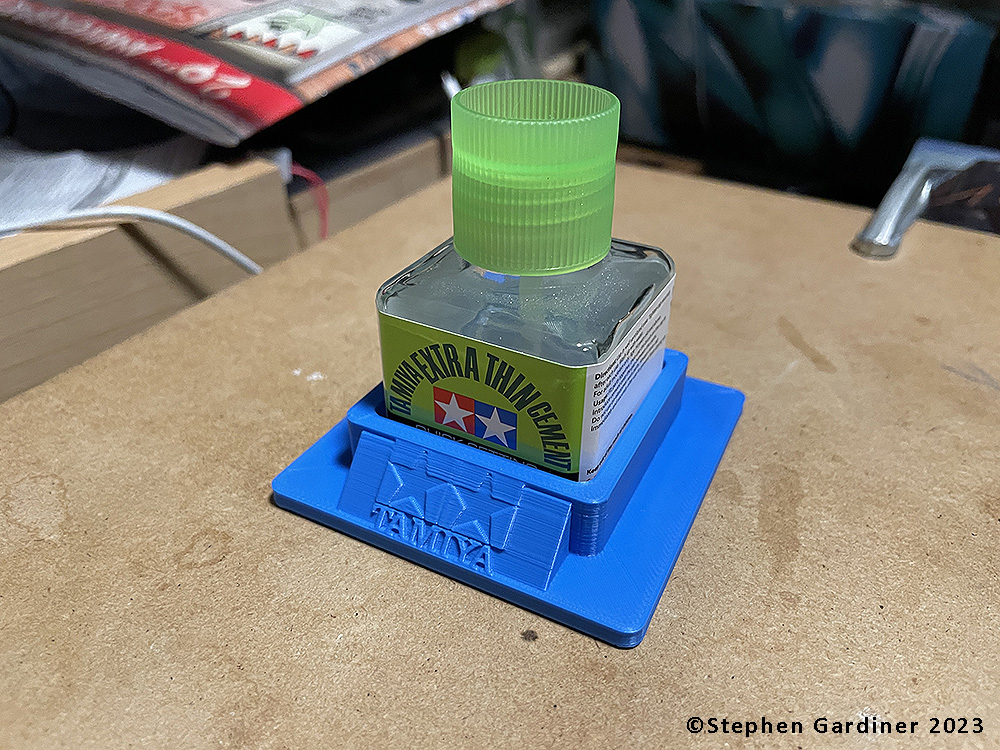
My next more intensive prints, more useful hobby things, MicroSet/Sol stands (I didn’t buy red filament, if I ever do I can reprint the MicroSol) and a Tamiya Glue Holder.
With some serious stuff done, it was time to have some fun. With the huge range of things out there for free and to buy, I can see I am going to be busily printing things for a while. The downside is, that prints can take a very long time to run. A case in point, I decided to make a fancy holder for my Wacom Pen Tablet stylus. I found a Darth Vader pen holder, and downloaded it. My first print, I thought I had put on supports, or extra material to hold pieces that are otherwise floating in space. I had not. So, Vader got about half way up his torso, and his arms just globbed off into spools of filament, so I cancelled it, but not before it had been printing for close to 5 hours. Sigh. After this, I tried printing the head which is a separate part at a couple of different sizes. It was clear the 100% size was too big from the failed print. So I printed a 50% and 75% head to see how well the detail held up. The 50% was lacking greatly, the 75% still looked good, and the size of the part in the software to create the print file still felt big enough to hold the stylus, so I printed it. The entire body of 75% Vader, with supports was about a 4 hour print. There are lots of things I’d like to print that are bigger, but I had a rash of failures after Vader as I continued to learn. Little mistakes. Not checking the alignment of the extruder nozzle and the print bed (they drive apart when you pry prints off the bed), and as the gap grows, prints don’t hold. Or printing with the wrong settings. I put supports on a part that clearly didn’t need them and where they were impossible to remove. I don’t mind a bit of time and effort in the learning curve, or a bit of wasted material. That’s only money and I know at the end of the day, once I master it and get the process down, I will stop wasting material.
Lord Vader…Keeper of the Wacom Tablet Stylus. And the first failed print and size comparison of his head at 100%, 50% and the final 75% size of the original model.
So, with about a week of play under my belt, I am starting to get confident, and learn where I have been making mistakes leading to failures, and what my process needs to be. It also has got me drawing things myself again, the picture below is the first print from the printer of something I drew, a simple frame, for inside a future project, but its a start, and I’m now busily drawing other things and thinking of how this can help me finish the remaining buildings on the layout (framing for buildings!).
I have a love-hate relationship with figures, but I think some of that is because I am just, not great at painting them. I have, and I can, but its not something I’ve done a lot of. I have, been trying to build up my skills in this area, through both stuff for train and non-train projects. Having recently received my absolutely gorgeous British Railways Class 37 from Accurascale, I saw that they were selling Colour 3D printed crew figures specifically designed to fit their locomotives. I believe these are being printed for them by Modelu, but I am not sure. Regardless, as an aside Modelu are printing some of the finest model figures, and they can print almost everything in their inventory in any scale you want. Their figures are designed from 3D scans of staff and volunteers at Heritage Railways across the UK. They are available direct, and Yarmouth Model Works has started importing them to North America.
So, all that said, I ordered two of their crew sets. The Class 37 BR Era set, and a GWR Manor crew set. I don’t have their manor, but I have other GWR locomotives the set would work for. The figures come nicely boxed (they were in ziplocks inside to keep them from rolling around, but those aren’t photogenic). The figures look a little sparkly in photographs, especially close ups, but to the naked eye you don’t notice it. I installed them using my normal figure glue of Woodland Scenics Accent Glue, it dries clear, and is a removable bond. If I ever need or want to remove the figures, they pull off with a gentle tug to break the glue bond. For the steam crew, I decided to add them to my Ex-GWR DukeDog 9017 in BR early black. The engineer and fireman figures really add to the open cab of the 4-4-0. I have several other open cab locomotives that would really benefit from crew figures, and I’ve been making a list for some time of Modelu sets for British locomotives that I have in hand or on order to add them.
Accurascale figure sets, and installing them into the Accurascale Class 37 and on a Bachmann Dukedog.
Its funny, for the layout I don’t really like figures, as I think they make an operating layout feel static as they don’t move, but on static models that live in a display case, I think they add visual interest to display case models. In any event, I am really pleased with these, and will probably look at buying more of these colour-printed figures from Accurascale if they will work for models in my collection.
By the time this posts I will have given my Clinic on the 3D printed model of the Dominion of Canada and the shipment of her back to the UK for restoration in 2012-13 at the Hindsight 2020 13.0 Virtual RPM today. A couple of weeks ago, I needed to get some detail photos for the presentation, and I had, an incident, where one of the span bolsters decided it was not attached to the rest of the car anymore, and while I thought I had a grip on everything, it took a trip to the floor. The 3D printed material can be brittle, and it shattered. Fortunately, it was a clean break, and the two parts could be re-aligned, and with some brass shims to provide some strength repaired. Whew, a sigh of relief, but not before some unpleasant words that can’t be repeated in polite company!
Before and after of an unplanned test of Newtonian Gravity Theory using a model, not recommended for your blood pressure.